A Week in Oahu: Ultimate 7-Day Itinerary for First Timers in Hawaii
Aloha and e komo mai! Looking to plan your next week-long trip in Oahu, Hawaii and don’t know where to start apart for Waikiki Beach? You’ve come to the right place as I’ve got some of the best things to do and see across the island and a planned out seven-day itinerary that is tried and true!
When to Visit Oahu
The best times to visit Oahu, or Hawaii in general, taking into consideration the weather, crowds and pricing, are going to be the shoulder months. That is: April/May and September/October. These two shoulder seasons can stretch out a bit into late March, early June and early November, but keep in mind that the wet season of the islands spans from mid-November to late March.
We were lucky enough to have beautiful weather our entire time in Oahu during the last week of March, with only a few short drizzle periods in one day. It was perfect but Oahu was experiencing a drought at the time, especially on the west side!
Though summer is the hottest season in Hawaii, it’s also the islands’ high season on top of Christmas/New Year’s. Crowds, heat and accommodation and car rental prices all shoot up at this time so we don’t recommend visiting in the summer if you can avoid it.
How to Get Around Oahu
Though Oahu has a dependable bus system that will get you to where you need to go, as well as rideshare apps, there’s truly no better transportation option than having your own car to explore whenever and wherever you want – all within legal limits of course! Yes, you’ll have to take into account daily parking costs at most mainstream accommodations, if not all, but its well worth it for you to have the complete flexibility.
If your plan is to mainly stick around Waikiki or your resort, relax and only visit some of the main attractions if convenient, then I wouldn’t worry about a car rental. But this itinerary is all about exploring all corners of the island on your own time.
Where to Stay in Oahu
Waikiki
If you’re hoping to be in the middle of the action with tons of top rated bars and restaurants in walking distance, and be relatively central to all corners of the island that you’re going to visit with this itinerary, I highly suggest looking at staying in Waikiki. Though it gets really busy, you’ll never be short of amazing live entertainment, delicious eats from all over the world, shopping opportunities and tons of beach time.
The Waikiki area is dense with accommodations ranging from affordable hotel rooms to full-blown vacation suites, giving you tons of options depending on your vacation style and group size. Practically every hotel and resort offers a pool to lounge at and you’re never too far away from Waikiki Beach. Homestay rentals are also on the market if AirBnB is more up your alley.
Our top recommendation that provides guests with renovated contemporary Hawaiian suites, close proximity to Waikiki Beach, affordable pricing inclusive of a buffet breakfast and happy hour drinks and snacks, is the Embassy Suites by Hilton Waikiki Beach Walk.

Ko Olina
If you’re looking for something more laidback, secluded, feet away from sand and water and high-end, check out the string of resorts that line the four manmade lagoons of Ko Olina. You’ve got tennis clubs, golf clubs, exclusive beaches, stunning beach walks, fine dining, top tier spas and your own shopping district here. It won’t offer the same variety and environment as Waikiki, but the secluded resort life offers something else you can’t get in the heart of Oahu’s tourist hub.
Our top most recommendation for a five-star resort stay in Ko Olina is the Four Seasons Oahu, which you can read all about our luxurious experience!

Where to Eat in Oahu
When we stayed at the Four Seasons Oahu, our amazing guest relations representative Cameran gave us a list of must-try’s while we were on the island. So here are a few local favourites that you can start with if you don’t have a clue yet of where people love to eat!
HAWAIIAN CUISINE
- Waiahole Poi Factory – located on the East near Kaneohe.
- Young’s Fish Market – located in both Honolulu and Kapolei (city where Ko Olina is situated).
- Helena’s Hawaiian Food – located in Honolulu.
- Highway Inn Kaka’ako – this one we visited with our Hawaiian friends Keawe and Alec where we tasted traditional Hawaiian dishes in a casual dining space; it’s also located in Honolulu.
NOODLES
- Adela’s Country Eatery – located in Kaneohe, they serve homestyle takeaway Hawaiian comfort food, including house-made pasta made with all sorts of creative ingredients.
- Marugame Udon – located on Kalakaua Avenue in the heart of Waikiki, we couldn’t recommend any other cheap eats must-visit that serves delicious Japanese Udon noodles, musubis, tempura and more.
POKE
- Fort Ruger Market – located in Honolulu, you can’t go wrong with this market that sells delicious poke and yummy Hawaiian and Filipino specialities.
- Foodland – visit this basic groceries store found all over the island not only for Hawaiian specialties but mouthwatering poke as well. A recommendation from Keawe and Alec!
OTHER FAVOURITES
- Got’z Grindz – right off the highway in Kaneohe, this little stop sells musubi galore.
- Royal Hawaiian Center – you have to check out the this large foodcourt, especially the Waikiki Food Hall, at least once during your visit.
Day 1 – First Glimpse of the East Coast & Japanese Gardens
For your first day on Oahu, it’s best to take it easy and visit a few tranquil spots that offer views of the luscious mountain landscapes of the island. The highlight for today will be exploring the Ho’omaluhia Botanical Garden and other parts of the east coast of the island.
Kualoa Regional Park
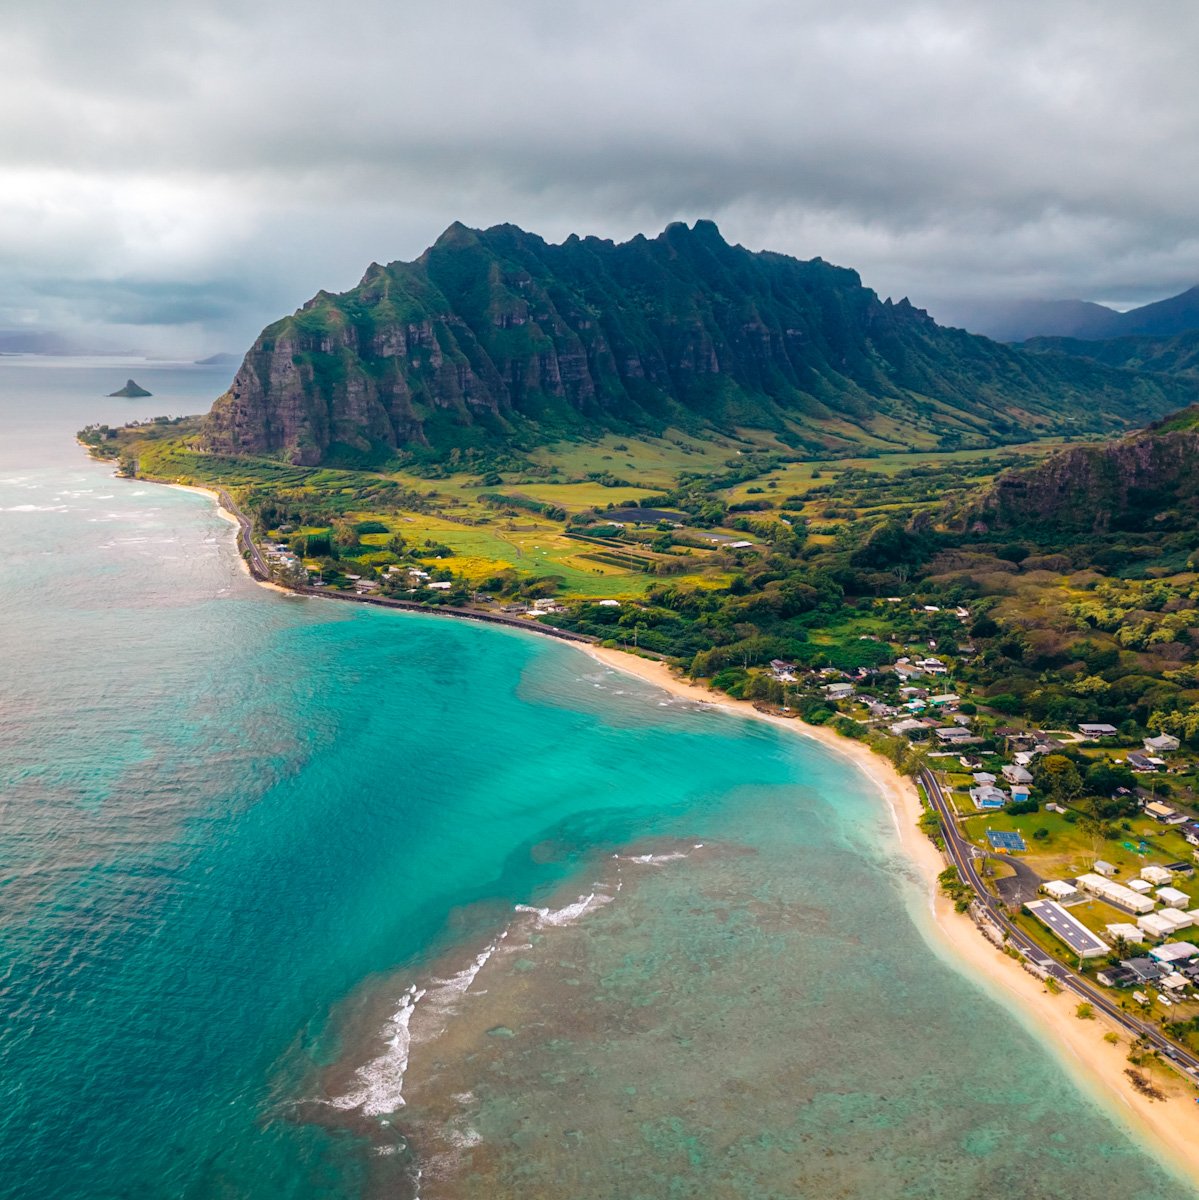
A fan of Jurassic Park will recognize the scenery immediately when visiting this park and beach. We enjoyed our first morning glimpse of Hawaii along this wide stretch of green grass and dipped our toes in the water and the soft sand for the first time at Kualoa Regional Park.

A quieter area particularly in the morning, and not as often frequented by other tourists, you’ll be able to enjoy a nice beach walk like the locals might. Facing East, you might be blessed to witness a Hawaiian sunrise as well, and catch views of the stunning “Chinaman’s Hat” Mokoli’i Island!

If you want to seek further parts of the renowned filming location, Kualoa Ranch offers Jurassic Adventure tours and UTV tours across its 4,000-acre nature reserve. Not only were some of the Jurassic Park movies filmed here, but so were Lost, Kong: Skull Island, Jumanji: Welcome to the Jungle, Hawaii Five-0 and 50 First Dates to name a few!
Ho’omaluhia Botanical Garden
The Ho’omaluhia Botanical Garden is one of the most picturesque drives and walks through thriving flora originating from different tropical regions of the world. The drive itself only takes about 20 minutes but you’ll want to stop and walk wherever you can and take in the impressive plantings from a perspective that your car cannot.

The botanical gardens are completely free to enter with no need for reservations or parking payments. They’re open daily from 9am to 4pm and only closed on Christmas Day and New Year’s Day. The drive in from the main gate is absolutely stunning and although it’s no longer allowed to stop on the road and take photos, there’s no rule against sticking your head out the window as you drive up slowly to enjoy the view and the Hawaiian breeze! The palm trees that line up the road and the majestic framing of the mountains are a marvellous sight.
While in the park, we recommend making stops at all of the obvious parking lots if you can. At the least, make your way to the Loko Waimaluhia Reservoir for some brilliant picture-worthy locations and to great the many catfish, swans and ducks. As you walk down from the Visitor Centre, you’ll traipse through various species of plants and trees. It’s impossible not to take a second to learn about them and their origins!

Keep driving to visit the other gardens as well as some notable viewpoints. Our favourites are going to be the Kilonani Mauka viewing area overlooking the entire garden and the benches that face the imposing Ko’olau mountains situated near the final parking lot at the pavilion. Have a look at the official maps to visualize your visit a bit more which you can download here!


Wandering the botanical gardens and their many scenic vistas is incredibly relaxing and an easy start to exploring Oahu. If you miss anything on the short drive, you can always re-visit the spots as you’ll need to U-turn at the end and exit at the entrance gate!
Byodo-In Temple
Transporting now to Uji, Japan, take a stroll through the temple grounds of the Byodo-In Temple. This stunning structure was built in 1968 to commemorate the 100th anniversary of the first Japanese immigrants to Hawaii. The temple completely reminds me of the Byodo-In Temple in Kyoto when we last visited, just with a slightly different backdrop.

Photo from Canva
Haleiwa Joe’s Haiku Gardens
End your first day with more Japanese garden vibes at this highly rated seafood open-air restaurant overlooking its own breathtaking tropical garden amidst a lush valley facing the famous mountain range that you’ve spent the better part of your day enveloped in.
Haleiwa Joe’s Haiku Gardens is open nightly from 4pm to 9pm and does not take reservations. If you’re hoping to catch the view and sneak away without dinner, no one’s going to be bothered by it! The view is stunning and it’s a great place to end your Day 1 adventures in the calm.
Day 2 – Exploring Diamond Head & Waikiki
Today’s all about exploring the busiest part of Oahu – Waikiki. From summits to beaches to outdoor markets, you’ll experience some of Oahu’s main attractions within a single day.
Diamond Head
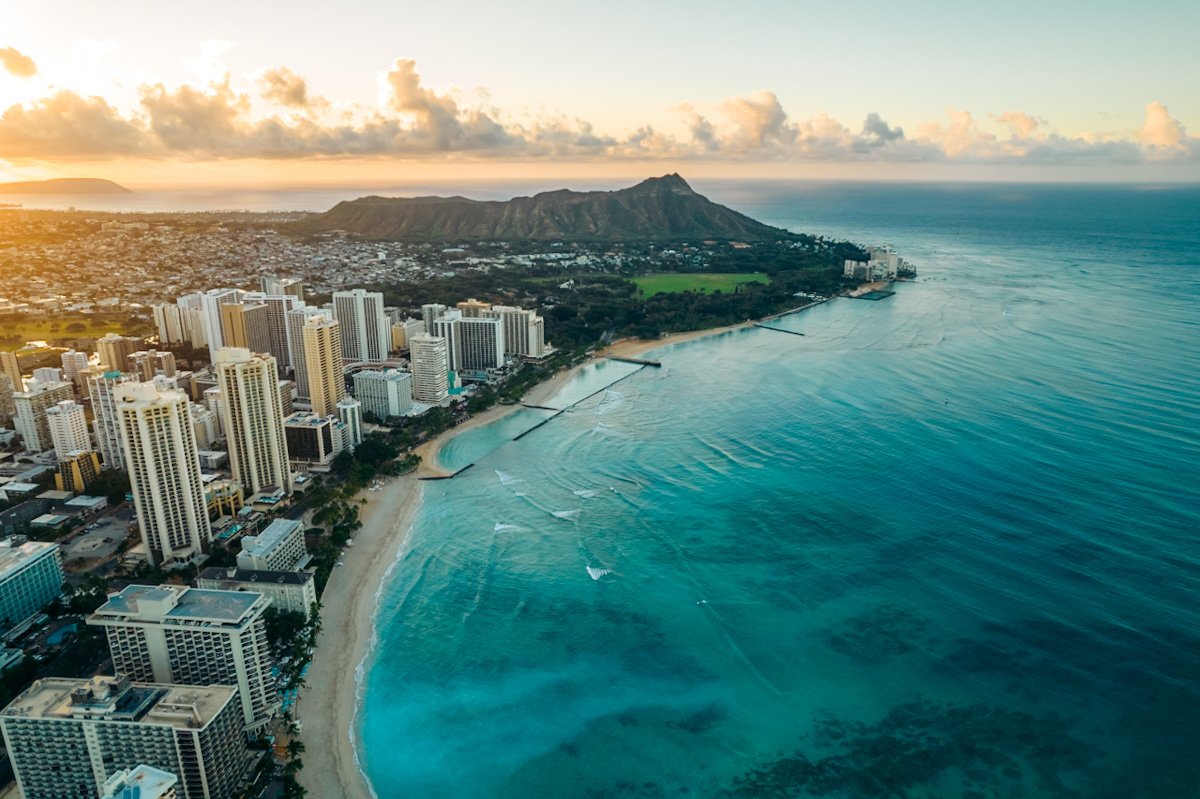
Arguably the most popular hike on Oahu, Diamond Head makes for a great introductory hike on the island. It’s an insane crater that you can admire from its ridgeline and 360-degree panoramic views surround you at the summit, where you can see Waikiki and Honolulu in clear view, the entire entire western coastline all the way to the Waianae mountain range, the southern coastline leading to the Koko Crater, the Ko’olau mountain range, and miles and miles of the Pacific Ocean.
The hike itself may seem daunting but it’s actually a lot shorter than you might think. It only takes about 60-90 minutes to the complete as it’s only 1.6 miles (2.6 km) roundtrip. At only 560 ft (170 m) in elevation gain, you won’t tire yourself out if you follow my recommendation of doing this hike bright and early!
If you’ve been following us long enough, you know that we’re all about the sunrise (and sometimes sunset) hikes. Golden hour lighting is incredible, but it’s mostly the mid-day heat and crowds that we want to avoid. Mid-day lighting is actually phenomenal on coastal view hikes like this one because the sun makes the water shine vibrantly, so we wouldn’t necessarily only recommend coming for sunrise. After all, this hike has opening hours with gates opening from 6am.

Photo from Canva
To reduce overcrowding on the hike, the government put in place a reservation system in which you can book your time slot online up to 14 days prior. It’s completely free and is honestly a great change to improve the conditions of the hike. The last hiking start time is 4pm with gates closing at 6pm, which gives you an opportunity to catch the sun set before racing back down to the gate!
Diamond Head has some steep incline sections but only through concrete stairs. This is where it can get tiring but the cardio workout is short-live considering the short distance. The stairs, tunnel and exterior pathways are narrow but they’re kept safe with guardrails throughout. This hike is certainly well constructed, even on the viewing platforms, so you won’t have to worry about any scrambling or slippage on loose rock in exposed areas.

Photo from Canva
There is very little shade and breeze throughout the trail so make sure to carry sunscreen with you and sun protective apparel, especially if you can’t make it here early in the day! You’ll find that the Hawaiian sun is quite strong, and you don’t want to learn it the hard way!
Waikiki Beach
Is there a better way to end a hike than by cooling off at the beach? If you manage to finish hiking Diamond Head while it’s still morning, Waikiki Beach will still be relatively less busy than it will become as the day progresses. And how awesome would it be to relax with the imposing view of the massive crater you hike hiked! Grab your beach towel, waterproof sunscreen and bathing suit – all the better if you had yours on prior to the hike! – and head straight for Waikiki Beach.
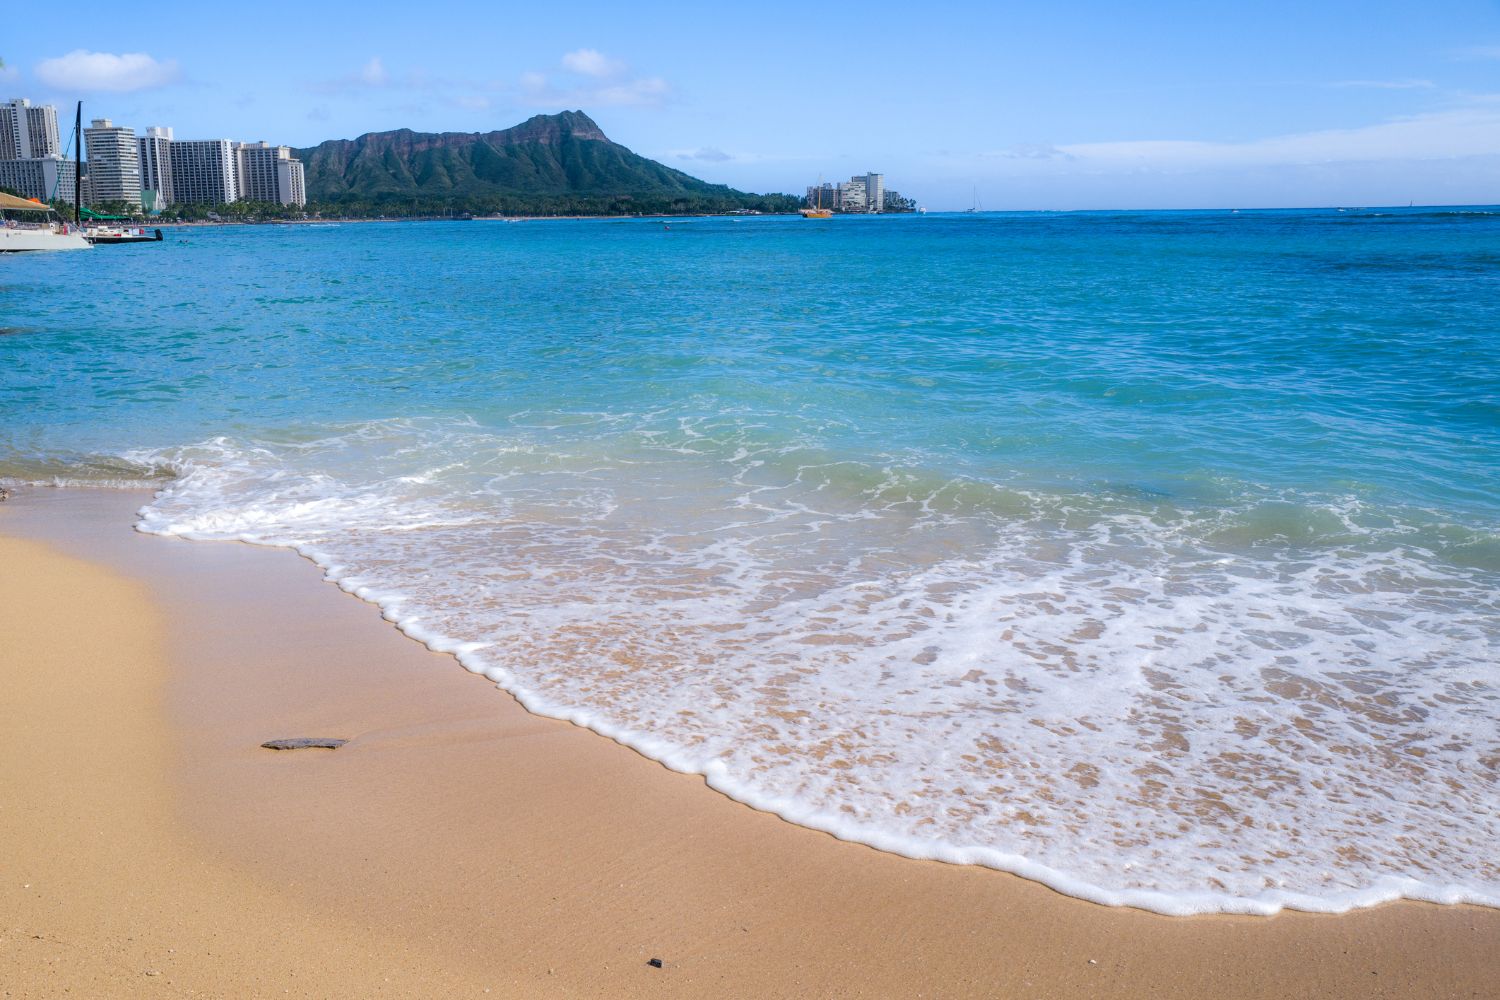
Photo from Canva
If you’re not staying in walking distance to the beach, there are a number of places you can park your car nearby, though it is quite costly. Typically, the hotels like Embassy Suites have valet parking for the day even for non hotel guests. Though it can run up to $50/day, it might be more convenient for you to opt in for this option versus trying to find street or lot parking in this extremely busy part of town.
In addition to lounging on the fine, pale sand along the wide and long stretch of beach, and bathing in the warm turquoise waters, you can also rent some paddle gear, try out motored water sports or take surfing lessons! If there’s any place to learn how to surf, it’d be in the home of Duke Kahanamoku. The calmer wave breaks of the Waikiki Beach shore are perfect for you to practice the basics in surfing.
Kalakaua Avenue
Apart for the stunning views from Waikiki, there’s much more to experience on this district’s small footprint. High end designer stores line Kalakaua Avenue and the adjacent streets, but so do big shopping complexes with local stores. There’s shopping for everyone, whether you’re looking to add a new designer handbag to your collection, needing some eco-conscious apparel that is locally made in Hawaii or simply looking for souvenirs and yummy treats to bring home.
There’s a little something for everyone in the Waikiki food scene as well. From cheap eats to fine dining, Japanese/Hawaiian fusion to good ol’ Cheesecake Factory Western style cuisine, you’ll never be short of food options here. We loved being on the hunt for cheap locally owned restaurants and food stands that quenched your cravings. At the end of this itinerary, we have our favourite food spots listed as well as some suggestions from locals!
Not only can you immerse yourself in Hawaiian cuisine and markets, but cultural live performances are always showing in the evenings! You don’t have to pay for tickets to witness amazing hula performers doing a ritual storytelling dance. There are public venues like the Waikiki Shopping Plaza where Polynesian dancers take the stage. If you don’t have the opportunity to partake in a lu’au, you’ll be able to have a taste of Hawaiian culture in the evenings in Waikiki.
Day 3 – Snorkeling in Hanauma & Hiking Makapu’u Point
You can’t visit Hawaii without being surrounded by marine wildlife at least once! Take on your first snorkeling venture at one of the most abundant and pristine marine ecosystems and finish at one of the most beautiful lookouts on the island.
Hanauma Bay
Probably the best snorkeling experience we’ve had to date! With thriving coral and so many colourful fish in huge densities, there was never a moment where we weren’t swimming among schools of fish. The fish seemed to be so used to us humans that they wouldn’t scurry away but you could get so close to touching them.
As the most popular snorkeling spot on the Oahu coast, Hanauma Bay suffered a lot of over-tourism in the past. In an effort to reduce it, they now have a cap of 1,400 visitors per day. They’re also only open Wednesdays through Sundays, so you may have to switch things around depending on what day of the week your Day 2 would land on. As one would predict, tickets sell out within minutes now. Our best recommendation for you to ensure your visit is locked in is to book online in advance. The earliest you can book is up to 48 hours prior with reservations made available at 7am HST to book for the day after the next.

Photo from Canva
Based on our experience and the history shown on the reservations portal, the time slots on the hour or half-hour sell out faster. If you think about it, most people don’t automatically choose to go snorkeling at 8:20am – they’d likely choose 8am on the dot. This can work in your favour if you book between the half-hour marks. With that said, the best time to visit is a little bit later in the morning/early afternoon, however, park entry times go from 6:45am to 1:30pm and the preserve closes at 4pm. We selected to go with a 8:10am and it was perfect, as the crowds were starting to accumulate just when we were leaving around noon.
Don’t fret if you don’t make it in time to book line! There are walk-ins available from the time the preserve opens. You can purchase your ticket and a set time will be given to you. Park entry is $25 per person (plus a 2.35% service charge if you’re booking online) and the parking fee is $3 cash only (the fee is refunded if you exit the park within 15 minutes of entering).
Make sure to arrive early and line up at your designated time slot sign! You’ll then be directed as a group to listen to the park guides for important safety instructions and watch a nine-minute orientation video on the preservation of Hanauma Bay. As a visitor, it’s important to do your part in keeping the ecosystem thriving so that it can stay open indefinitely to snorkel-enthusiasts like yourself!
If you have a lot to carry, there are trams to give you a ride down and up from the visitor centre to the beach. It’s completely free for visitors and they come quite often. Once you get to the beach, head to the change rooms if you need to, set your spot on the beach and hit the waters! The coral is very close to the beach shoreline even when the tide is at its highest. In some spots in the morning, you’ll see coral completely above the surface of the water. It’s imperative that you be careful when swimming around the coral and not step on, touch or swim over the coral.

Photo from Canva
One of our greatest memories from Hanauma Bay was spotting a honu (sea turtle) digging for food in the rocks for such a long time! So many of us were watching him from a distance and he swayed with the waves! It’s not hard to spot turtles in the bay so keep a lookout, especially in the deeper sections further into the water.
Here’s what you need to pack for Hanauma Bay:
- swimsuit + rashguard for extra sun protection
- reef-safe sunscreen
- microfiber beach towels
- water shoes (if you don’t have fins)
- snorkel + mask + fins (optional)
- underwater camera gear + waterproof phone case
If you bought your own snorkel gear at the local store, rented your own for the week on the island, or brought your own from home, all the better! We bought ours at the ABC store in Waikiki Beach Walk and they did not work whatsoever. Luckily, the state park offers their own rentals. It’s a little pricy but they work wonders and you can always go right back to them if things aren’t fitting properly. The premium package with mask, fins and dry snorkel is $20 whereas the mask and dry snorkel combo on its own is $12.
Halona Blowhole Lookout
After spending the better part of Day 3 swimming with the fishies, the rest of the day will be less tiring but still exciting. Just a seven-minute drive from Hanauma, you’ll find a small cove nestled within sharp rock cliffs. There’s a decently sized parking lot right off the highway where you’ll be able to capture the sight of the Halona Blowhole. Many will hike down to the Halona Beach Cove for a swim against strong waves. The water gets deep real quick off the shore and the waves carry so be careful if you decide to go for a swim here.


This is a great ‘pull-over and see what’s there’ kind of stop before making your way to your last viewpoint of the day! You don’t have to stay long but could end up spending a few hours of the afternoon here.
Makapu’u Point Lighthouse
Makapu’u Point Lighthouse trail might just be the easiest hike in all of Oahu! With 2.5 miles (4 km) out-and-back and 510 ft (155 m) elevation gain, it’s a low and steady incline on a paved path the whole until you reach the lighthouse. It’s incredibly stroller friendly if you’re doing a family trip!
We loved doing this hike for sunset before the gate closed as there were fewer people and, well, it’s sunset. The trail has a single switchback around the halfway point which is a great place to stop and admire the south coast and the Kaiwi Channel that leads to the other islands of Hawaii.

The trail’s destination at Makapu’u Head gives you a whole different perspective! The viewing platform isn’t all that big but you see so much even along the stairs and concrete paths that lead to the final vista. The red-roofed Makapu’u Point Lighthouse is actually further down in altitude from the summit and is off-limits, but it sure makes for a picturesque subject against the deep blue background. The windward coast towards the north showing off the south section of the Ko’olau mountains, Makapu’u Beach Park and the offshore islets home to the seabird sanctuaries, is the hero view for me on this hike.


Makapu’u is the easternmost tip in all of Oahu! If you opt in to do this easy hike for sunrise instead, it might just be one of the glorious sunrises you can experience from this elevated lookout. I wouldn’t hold it against you if you switched things around for better conditions! We would do the same.
Day 4 – Exploring the West Coast
It’s time to head north along the west coast to see what this side of the island has to offer. From pillbox hikes to quiet beaches and a one-of-a-kind Hawaiian excursion sailing the seas, today’s another jam-packed day.
Ma’ili (Pink) Pillbox Hike
The famous pink pillbox, or Pu’u O Hulu trail, is a bucket list hike in Oahu. Another short one at 1.6 miles (2.6 km) and 680 ft (207 m) elevation gain, it’s considered moderately difficult with a slightly steep elevation all the way, though very little to no scrambling is needed. You may just have to be prudent around the loose rocks and sand where there’s an incline! As opposed to Diamond Head Crater and Makapu’u Point Lighthouse that are very well constructed with guardrails and paved paths and stairs, the pillbox hikes are generally dirt-packed trails with no directional signs.
The trail has some shade in the bushes and trees, but reaches an exposed area once you arrive at the pillboxes. There’s very little wind and breeze here so pack the extra water, hat, sunglasses and of course sunscreen! You just never realize how long you want to spend at the top until you get there.


Ma’ili Pillbox hike is not only a highly rewarding hike because of the unobstructed views of the brilliant west coast, the Waianae mountain range, nearby local towns of Nanakuli and Ma’ili and the reddish arid terrain of the Pu’u O Hulu. The pillboxes themselves are a worthy attraction you’ll find at the end of this physical feat.
The short switchbacks lead you to four distinctive pillboxes. Each of them has incredible graffiti art plastered all over the interior and exterior, and these vibrant homages to Hawaiian life and culture make the hike all the more fulfilling and memorable. The artwork only stays for so long before new local artists come and make their own tweaks or start from a blank slate.


The pillboxes are all different in size and colour. The first one is a little bit small but I loved the artwork inside the most! The second one is the largest and our guide Jenny from Keawe Adventures referred to it as the penthouse pillbox. It was extremely easy to climb onto the roof of this one! The third is the famous pink pillbox painted this colour every year for breast cancer awareness. And the fourth, a little ways further, is quite massive but considering the ridge walk to it is quite risky, we saved it for another date. There’s no harm at ending your journey at pillbox #3! The views are all very similar.


If you stick around long enough, you might be lucky to find some whales breaching in the deep blue waters from a distance! Be on the lookout for them when you’re at the pillboxes.
Makua Beach
This beach is a hidden gem in the far northwest, near the very end of the road at the westernmost tip of Oahu. You’ll know you’re in a local and remote area by: the fact that the parking lot isn’t defined and is essentially a patch of gravel and sand; the many signs saying not to leave belongings in your vehicle and to beware of robbers, and the not-so-obvious walk down to the beach through bushes where there is no fresh water shower stall or lifeguards.
I’d say save Makua Beach if you’ve got time to spare and an eagerness to keep exploring spots that most tourists don’t frequent. It’s a phenomenal beach with views of the most northwestern peaks of the Waianae range. The sand is pristine and it’s a lot of fun to go and discover little rock caves and tide pools where crabs might be crawling. The waves and current can be rough out here so pay attention to the warning signs if you decide to swim or wake board out here. If you’re lucky, you might spot a seal lounging on the sand out here!
Don’t worry if you can’t make it out to Makua Beach. There isn’t too much going on in this area as it’s mostly suburbs and you’ll have plenty more beach time to look forward to later on!
Electric Beach
If you want a more challenging yet gratifying snorkeling experience, Electric Beach is a local’s favourite. It might seem like an odd place to swim and admire the marine life, considering that it’s right next to an electric power plant and just off the highway. But in actual fact, its location next to an unsightly industrial plant is the exact reason why this is an ideal spot for snorkeling. How? Well, the power plant discharges warm water directly into the ocean about 650 ft (200 m) offshore, inviting all the friendly sea life right to the beach.
Sea turtles are incredibly easy to spot here, even right off the beach you can see their heads bobbing above the surface of the water. Snorkeling at Electric Beach is definitely for more experienced swimmers as you would typically want to go as far out as where the large water pipe ends are situated. You’ll witness thousands of fish, turtles and other marine life treading in the warm water. They love it and so will you!
In comparison to Hanauma Bay which is much more tame, Electric Beach is certainly less restrictive and you can go out as far as you’d like without someone yelling at you. This means that you’re the only one responsible for your safety out here. The waves can carry you far, as one of our local guide for canoe sailing (see below) mentioned rescuing people a number of times who found themselves wayyy far out from the beach.
If you linger around the pipe openings and no further, you’ll be in good hands. If you’re unsure of your capabilities, always have a lifejacket on hand and wear it out there. You can always bring it back to the beach if you no longer need it!
Outrigger Canoe Sail Tour
Head to Ko Olina for some relaxing beach time in their lagoons surrounded by five-star resorts. If you’re starving by now, I recommend visiting the Four Seasons for some delicious seafood dining. We absolutely love the menus at Mina’s Fish House, La Hiki and Noe! Four Seaons Oahu is located on lagoon #1, the Kohola Lagoon. This is where you’ll come across Hawaiian Ocean Adventures, your hosts for the cultural outrigger canoe sail tour!

Sail aboard the Ka’aumoana as you journey along the west coast, discovering so much more than you would be able from land. You can book a private tour, or be a part of a group tour up to 8 people, anytime from 8am to 1pm daily. You can choose between a 55-minute and 85-minute tour which is plenty of time to learn about Polynesian history while floating on the deep blue surface.

Along the way, you’ll be able to pass Electric Beach, experience the glass-like ocean surface that allows you to see right to the bottom, and maybe even catch some more honus in the wild! Some folks are fortunate enough to sail with dolphins and catch whales in sight too!
We were on cloud nine the whole way through, especially as we listened intently to our captain Zach tell us tales of the Hawaiian people, teach us Polynesian voyager tradition and Hawaiian words, and give us his personal anecdotes of Hawaiian life and culture. The outrigger sailing canoe itself was constructed just as it was in traditional fashion but with modern materials. Apart for the motor and bolt that holds it to the canoe, all sections and beams were held by rope alone!

We also highly admired the meaning behind the sail design. The triangular emblem for the mountains, fish images between waves for the ocean and the eagle – “master of the sky” – in between all came together harmoniously to well represent Hawaii and its people.
Day 5 – Scouting Sea Turtles on the North Shore
Today’s going to be all about the North Shore, famous for some of the best surf waves in all of Hawaii. This coast also offers you the greatest chances to spot turtles lounging on the sand!
Ka’a’awa Beach
On your way up to the North Shore if you are staying down south, drive along the eastern coast to catch some gorgeous views and make a stop at this beautiful local beach! The sand is extremely soft and you might just spot a few locals wading and snorkelling in the water nearby. We loved having this beach almost all to ourselves with the mighty views of the Ko’olau mountain range scraping the sky and plunging into the sea. The feature photo of this post is of Ka’a’awa Beach!

Ka’a’awa Beach was the only spot on the entire island where we managed to spot a whale breaching! We saw the cute whale waves right from the beach, and although we didn’t get a chance to capture the big guy on camera or drone, we were so happy to stand there in awe. A great start to our morning!
Turtle Beach
The search for turtles begins at Turtle Beach! We didn’t have much luck seeing any here but we walked along the rocks following little crabs and sea snails in mini tide pools. It gets pretty busy here at Kuilima Cove as the Turtle Bay Resort is situated right there. You can head for a swim here or move on if there are still no honu sightings, you can head to the west side of the resort to Turtle Bay and walk along the stretch of beach where it’s much quieter.

Photo from Canva
The most optimal time to see turtles in between 11am and 1pm so don’t head to the North Shore too early. You might still be able to see them basking in the sand closer to sunset as well!
Sharks Cove
One of the best snorkel spots on the island is Sharks Cove, located at Pupukea Beach Park. It consists of a large number of tide pools protected by a natural breakwater which renders the water in the cove to be extremely calm and clear. You don’t even have to have your head underwater to see the fish swimming around your feet! The water is very shallow, usually waist deep, which makes it much easier to see the marine life from above the surface.

Photo from Canva
If you decide to wade in the water for a snorkel here, just know that the water is a little chillier on the north coast and water shoes are a must! I ended up cutting my foot on the sharp rocks because I only had flip flops on.
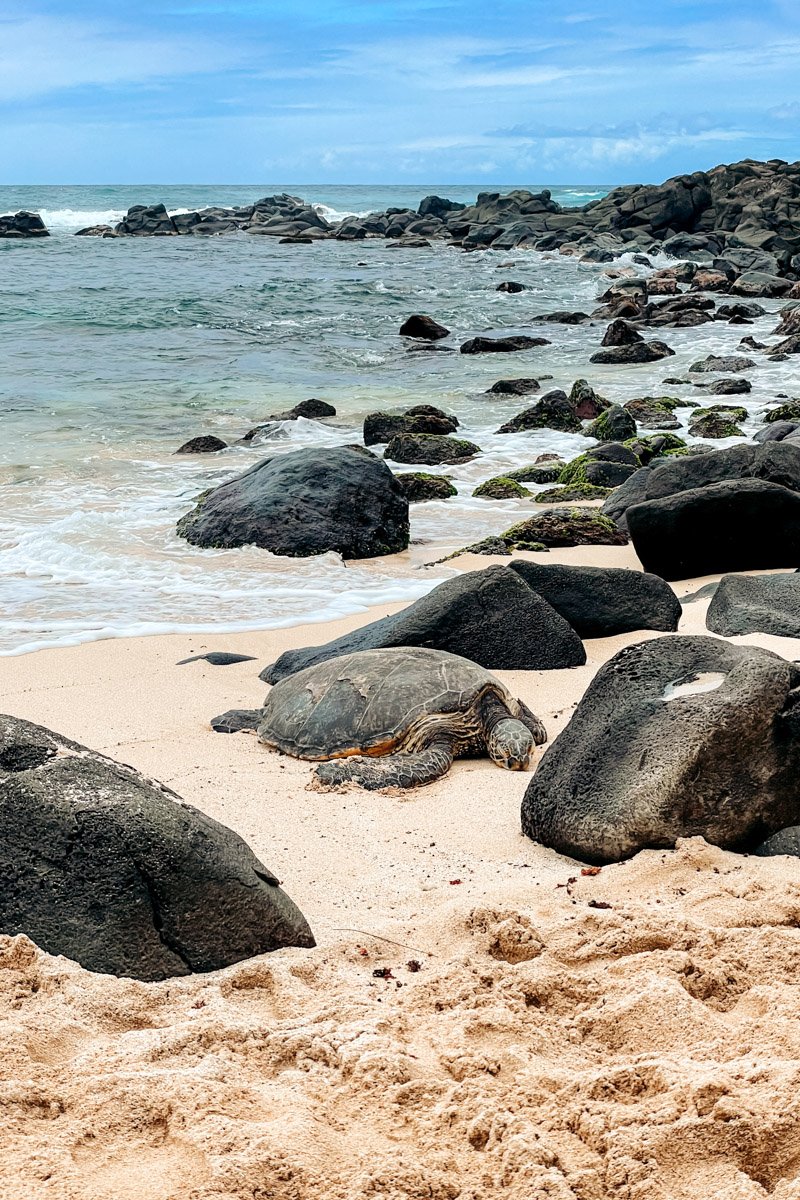
Laniakea Beach
The ultimate beach in all of Oahu to spot sea turtles in the wild is hands down Laniakea Beach. I was over the moon to finally find my napping turtle amidst black boulders on the beach that camouflaged the big lady! There are often volunteers who put up a “do not cross” tape around the turtle so that we wide-eyed tourists don’t disturb it in its natural habitat. Remember to keep your distance from these peaceful creatures: at least 10 ft (3 m) away, whether at sea or on land, and make sure not to block their access to or from the ocean.
If you have time to hit up other landings for possible honu sightings, check out Waimea Bay Beach and Pap’lloa Beach!
Hale’iwa
You might build quite an appetite after the hunt for turtle friends, long beach walks and some snorkeling. So you can’t leave the North Shore without trying some of their famous food trucks in Hale’iwa! The most renowned permanent food truck is Giovanni’s Shrimp Truck where they sell specialize in rich tasting garlic shrimp. It was finger-licking good but a little overrated in my opinion! We stood in line for over half an hour and paid $16 for a plate of 12 prawns and two scoops of rice. Maybe that’s worth it for you but I encourage you to check out the other stalls in the food truck lot as well!
Day 6 – Kaneohe Sandbar Excursion
A whole day dedicated to a self-guided paddling tour to explore various reefs underwater and relaxing on a sandbar a mile from shore.
Kaneohe Sandbar
A little more sense of adventure is reserved for your second last day! Now that you’ve had five days to acquaint yourself with the island and its wildlife and underwater terrains, it’s time to up the ante and put your navigation and paddling skills to the test!
We rented our two-person kayak at the Kama’aina Kayak and Snorkel Eco-Ventures in He’eia State Park by booking online for the half-day (i.e. 4 hours) option. The whole process from check-in to getting our snorkel gear – which is included in our rentals – and instructions on where to take our kayak was incredibly smooth. This was the first time we were ever going to anchor a kayak and dive into the deep waters just the two of us so we had a lot of questions and the staff answered them with lots of enthusiasm and patience.
We had our kayak from around 9am to 1pm which meant that the tide was going to rise towards the end, but we decided to go snorkeling first before heading straight for the sandbar. In hindsight, perhaps it might’ve been best to hit the massive sandbar first when the tide is still low but we were eager to catch sights of fish and maybe turtles underwater. After all, it’s a 1-mile trek from the boat harbour to the best snorkeling spots then 2 miles from there to the sandbar. You can decide what works best for you and your timing! To check the tide forecast in Kaneohe Bay, visit this website!

Photo from Canva
Being able to try our hands at a self-guided kayak and snorkeling tour was such a memorable and accomplishing experience. I wouldn’t trade our ability to challenge ourselves like that for any other tour here. We could swim pretty much at any of the reefs that were within reach and lookout for rare wildlife. But if you wanted to have a fun time aboard a boat and party it up on the sandbar with all your water activities there, you can always book a boat tour there! Snorkeling and turtle watching would also be part of the package. You just might not have the freedom or time to go as far out as we did but that’s a trip and a half anyway!
Book your Kaneohe Sandbar boat tour here!


It was certainly tiring kayaking for over two hours total, with nearly one hour straight from the coral reefs to the sandbar. It was a great learning experience nonetheless. And on our way back to the dock, not far from it as we were in the shallow reeds area, we saw a turtle zoom gracefully under our kayak! We stopped in our tracks and just kept watching it keep circling around near us with the sunlight shining against its shell.
A quick note – that we weren’t told until we got back to land – Kaneohe Bay is one of the largest breeding grounds in the world for hammerhead sharks. They’re harmless but they love to hang around the harbour as turtles are a food source for them. The good thing is, that means there are more opportunities to see more wildlife right from your kayak! But maybe that’s also not a good thing!
Here’s what you need to pack for a day’s kayaking excursion in Kaneohe:
- a dry pack to keep safe all of your belongings
- some snacks and/or lunch
- a rashguard (the lifejacket is the culprit)
- microfiber beach towels
- tons of reef-safe sunscreen
- underwater camera gear + waterproof phone case
Day 7 – Hiking and Beach Time in Lanikai
Lanikai Pillbox Hike
Saving the more technical hike for last! Though we’ve already added a pillbox hike to the itinerary, the Lanikai Pillbox hike in Kailua offers a whole different view than Ma’ili! It’s one of our favourite views of and on the island as you get to get up close and personal with the Ko’olau mountains on one side and peer over to Lanikai beach, the Moku Nui and Moku Iki islands and the east coast on the other.
Over a distance of 1.7 miles (2.7 km) roundtrip and 625 ft (190 m) elevation gain, you’ll be walking along a narrow trail on a dirt path that heads in a single direction with no switchbacks. It’s completely exposed, so it can get hot fast even in the morning, and it’s more technical because a lot of the hike towards the end requires scrambling. There are some steep sections on the rocks you’ll need to climb, and although there are young kids who do this hike with their families, don’t be fooled! You’ll still need to be careful and watch your footing throughout.

There are two pillboxes situated along the Kaiwa Ridge. If it’s crowded at the first one, make your way to the second. Both are caked with graffiti artwork and this is where most of those Instagrammable shots of people hanging off the pillbox ledge are taken. Now you’ll see the secret to those photos’ deception!

It’s not too difficult to get up onto the roofs of the pillboxes. They provide such a stunning view of the east it’s hard not to have a picnic up there! We chose to keep going along the trail and find a smaller enclave to enjoy a small meal in the quiet. There are a number of boulders amidst bushes you can have a seat and that overlook the mountains on the west.


If you’re also heading to Lanikai Beach for a swim afterwards – which is our recommendation – aim to park in the residential streets nearest the beach. You won’t be able to park right at the trailhead as it’s private property, but it’s a short walk from the beach. The earlier you make it here, the better! Both the hike and the beach get crowded so if you lock in your spot, you won’t have to worry about it for the rest. ofthe time that you’re here!
Lanikai Beach
Leaving the best local beach on Oahu for last, Lanikai Beach is popularly known for its perfect white sand and shining, clear water to swim in. What better place to soak immediately after a strenuous hike? Swimming in these waters reminded me so much of our amazing getaways in the Caribbean, much like along Bavaro Beach in Punta Cana, Dominican Republic.
Didn’t get enough beach time with pristine white and soft sand and clear turquoise waters? You can head a little further north to Kailua Beach to revel in the marvellous Hawaiian sun and coast one last time!
Oahu, Hawaii is just as phenomenal as they say it is! So what are you waiting for? The Polynesian island is welcoming you with open arms to wander amidst its mountains and coast lines, tropical gardens and offshore reefs!

